💭회고
PlayerController는 입력만 담당하고, 캐릭터 클래스에서 실제 액션을 처리해야 한다는 점이 중요했다.
IMC를 활용하면 게임 진행 중 특정 입력을 활성화/비활성화할 수 있어서 UI나 전투 시스템과 연동할 때 유용할 것 같다.
🗺️마인드맵
📒학습 내용
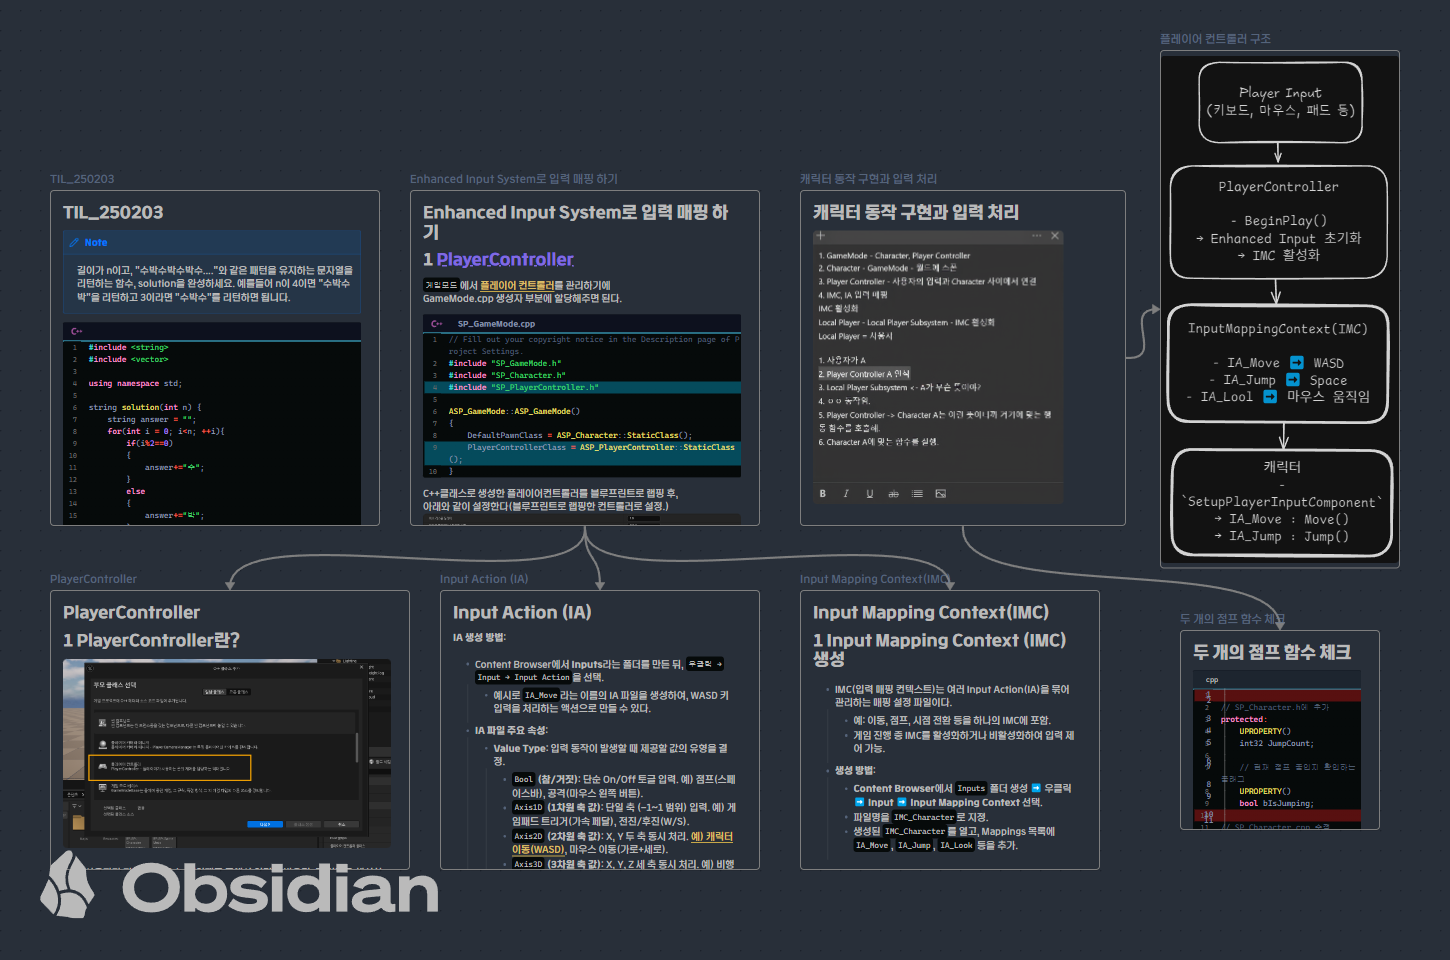
1️⃣ Enhanced Input System으로 입력 매핑하기
- UE5에서는 기존 Project Settings → Input 방식 대신 Enhanced Input System을 사용한다.
- 입력을 Input Mapping Context(IMC) 와 Input Action(IA) 로 나눠서 관리한다.
✅ PlayerController에서 입력 처리
- GameMode.cpp에서 PlayerControllerClass를 설정하여 플레이어 컨트롤러를 관리한다.
- PlayerController는 입력을 감지하고, IMC를 활성화하여 Input Action(IA) 를 실행한다.
✨ C++로 생성한 PlayerController를 블루프린트로 랩핑하여 사용하면 더욱 유연한 조작이 가능하다.
<SP_GameMode.cpp>
#include "SP_PlayerController.h"  // 플레이어 컨트롤러 헤더를 등록해줘야 한다.

ASP_GameMode::ASP_GameMode()
{
    DefaultPawnClass = ASP_Character::StaticClass();
    PlayerControllerClass = ASP_PlayerController::StaticClass();
}
➡️ 이렇게 설정하면, ASP_PlayerController가 현재 게임에서 플레이어 입력을 담당하게 된다.
✅ IMC(Input Mapping Context) 설정
- 여러 Input Action(IA) 들을 묶어서 하나의 IMC 로 관리한다.
- IA는 캐릭터의 이동, 점프, 발사, Zoom 등과 같이 특정 동작을 추상화한 단위라고 생각하자.
- IMC를 활성화하면, 해당 IMC에 포함된 모든 입력이 동작한다.
- UInputMappingContext*를 통해 여러 개의 입력을 그룹화할 수 있다.
class UInputMappingContext;  // 전방 선언, 입력 매핑 컨텍스트를 나타내는 객체
class UInputAction;  // 전방 선언, 특정 입력 동작(예: 이동, 점프 등)을 나타내는 객체

UCLASS()
class START_API ASP_PlayerController : public APlayerController
{
    GENERATED_BODY()

public:
    UPROPERTY(EditAnywhere, BlueprintReadWrite, Category = Input)
    UInputMappingContext* InputMappingContext;
    UPROPERTY(EditAnywhere, BlueprintReadWrite, Category = Input)
    UInputAction* MoveAction;
    UPROPERTY(EditAnywhere, BlueprintReadWrite, Category = Input)
    UInputAction* JumpAction;
    UPROPERTY(EditAnywhere, BlueprintReadWrite, Category = Input)
    UInputAction* LookAction;
};
➡️ 이렇게 하면 PlayerController에서 입력 매핑 컨텍스트를 설정하고, 개별 입력 액션(IA)을 지정할 수 있다.
2️⃣ Input Action (IA) & Input Mapping Context (IMC) 설정
✅ IMC(Input Mapping Context)란?
- IMC는 여러 개의 Input Action(IA) 을 묶어서 관리하는 입력 매핑 컨텍스트다.
- 하나의 IMC에 이동(IA_Move), 점프(IA_Jump), 시점 전환(IA_Look) 등을 포함할 수 있다.
- 게임 중 IMC를 활성화하거나 비활성화할 수 있어서, 특정 모드(전투, 탐색 등)에 따라 입력을 다르게 설정 가능하다.
📌 IMC 생성 방법
- Content Browser에서 Inputs 폴더 생성
- 우클릭 → Input → Input Mapping Context 선택
- 생성한 IMC 파일을 열어, IA_Move, IA_Jump, IA_Look 등 추가
📌 IMC 예시 (이동 & 점프 설정)
UCLASS()
class START_API ASP_PlayerController : public APlayerController
{
    GENERATED_BODY()

public:
    ASP_PlayerController();

    UPROPERTY(EditAnywhere, BlueprintReadWrite, Category = Input)
    UInputMappingContext* InputMappingContext;
    UPROPERTY(EditAnywhere, BlueprintReadWrite, Category = Input)
    UInputAction* MoveAction;
    UPROPERTY(EditAnywhere, BlueprintReadWrite, Category = Input)
    UInputAction* JumpAction;
};- UInputMappingContext* InputMappingContext: 여러 개의 입력 액션을 묶어서 관리.
- UInputAction* MoveAction: 이동 입력 처리 (예: WASD).
- UInputAction* JumpAction: 점프 입력 처리 (예: 스페이스바).
3️⃣ PlayerController에서 IMC 활성화
PlayerController에서 IMC를 활성화하려면, Enhanced Input System을 사용하여 매핑 컨텍스트를 추가해야 한다.
void ASP_PlayerController::BeginPlay()
{
    Super::BeginPlay();
    if (ULocalPlayer* LocalPlayer = GetLocalPlayer())
    {
        if (UEnhancedInputLocalPlayerSubsystem* Subsystem =
            LocalPlayer->GetSubsystem<UEnhancedInputLocalPlayerSubsystem>())
        {
            if (InputMappingContext)
            {
                Subsystem->AddMappingContext(InputMappingContext, 0);
            }
        }
    }
}- LocalPlayer->GetSubsystem<UEnhancedInputLocalPlayerSubsystem>()
- 현재 플레이어 컨트롤러가 관리하는 로컬 플레이어의 Enhanced Input 시스템을 가져온다.
- Subsystem->AddMappingContext(InputMappingContext, 0); : IMC를 추가하여 입력을 활성화한다.
- 0 : 우선순위를 의미하며, 숫자가 낮을수록 우선순위가 높다.
4️⃣ 캐릭터 동작 구현 & 입력 처리
- PlayerController는 입력을 감지하지만, 캐릭터 클래스에서 실제 동작을 구현 해야 한다.
- SetupPlayerInputComponent() 에서 입력 바인딩을 설정해야 한다.
🤖입력 흐름
1. PlayerController가 IMC를 활성화한다.
2. IMC에는 IA_Move, IA_Jump 등의 UInputAction이 키보드/마우스와 맵핑되어 있다.
3. 캐릭터(SP_Character)에서 SetupPlayerInputComponent() 를 통해 각 액션과 실제 동작 함수(예: Move, Jump)를 바인딩한다.
4. 바인딩된 함수가 실제 캐릭터의 움직임을 처리한다.
✅ 입력 바인딩 (SetupPlayerInputComponent())
void ASP_Character::SetupPlayerInputComponent(UInputComponent* PlayerInputComponent)
{
    Super::SetupPlayerInputComponent(PlayerInputComponent);
    if (UEnhancedInputComponent* EnhancedInput = Cast<UEnhancedInputComponent>(PlayerInputComponent))
    {
        if (ASP_PlayerController* PlayerController = Cast<ASP_PlayerController>(GetController()))
        {
            if (PlayerController->MoveAction)
            {
                EnhancedInput->BindAction(
                    PlayerController->MoveAction,
                    ETriggerEvent::Triggered,
                    this,
                    &ASP_Character::Move
                );
            }
        }
    }
}- Cast<UEnhancedInputComponent> → 기존 UInputComponent를 Enhanced Input 시스템으로 변환.
- BindAction() → 특정 InputAction(IA)가 실행될 때 실행할 함수 지정.
5️⃣ 캐릭터 이동 구현
void ASP_Character::Move(const FInputActionValue& Value)
{
    if (!Controller) return;
    const FVector2D MoveInput = Value.Get<FVector2D>();

    if (!FMath::IsNearlyZero(MoveInput.X))
    {
        AddMovementInput(GetActorForwardVector(), MoveInput.X);
    }
    if (!FMath::IsNearlyZero(MoveInput.Y))
    {
        AddMovementInput(GetActorRightVector(), MoveInput.Y);
    }
}- Value.Get<FVector2D>() : 입력 값을 2D 벡터로 변환해 WASD 이동값을 가져온다.
- AddMovementInput() : 캐릭터 이동 함수. X 값은 전후 이동, Y 값은 좌우 이동을 처리한다.
6️⃣ 캐릭터 점프 구현
void ASP_Character::StartJump(const FInputActionValue& Value)
{
    if(Value.Get<bool>()) Jump();
}
void ASP_Character::StopJump(const FInputActionValue& Value)
{
    if(!Value.Get<bool>()) StopJumping();
}- Value.Get<bool>() : 점프 키가 눌렸는지 확인 후, Jump() 또는 StopJumping() 실행.
7️⃣ 캐릭터 시점 회전 구현
void ASP_Character::Look(const FInputActionValue& Value)
{
    FVector2D LookInput = Value.Get<FVector2D>();
    AddControllerYawInput(LookInput.X);
    AddControllerPitchInput(LookInput.Y);
}- LookInput.X 로 좌우 회전(Yaw), LookInput.Y 로 상하 회전(Pitch)을 조절한다.
🎯 추가 기능: Pitch(상하 회전) 제한
- 상하 회전 각도를 제한하고 싶다면 ClampAngle() 을 활용하면 된다.
🐞 회전각도 사용 시 그냥 Clamp를 사용했더니 버그가 발생했다
- ClampAngle()을 사용해야 360도 회전에서도 안전하게 동작한다!
✨마우스 감도 조절 + 회전 제한 기능추가!
더보기
void ASP_Character::Look(const FInputActionValue& Value)
{
    float Sensitivity = 1.0f;
    FVector2D LookInput = Value.Get<FVector2D>();

    AddControllerYawInput(LookInput.X * Sensitivity); // Yaw 회전 (좌우 회전)
    AddControllerPitchInput(LookInput.Y * Sensitivity); // Pitch 회전 (상하 회전)
    // Pitch 제한 적용
    if (Controller)
    {        FRotator Rotation = Controller->GetControlRotation(); // 현재 회전값 가져오기

        // Pitch 값을 제한 (-60도 ~ 60도)
        Rotation.Pitch = FMath::ClampAngle(Rotation.Pitch, -60.0f, 60.0f); // 🐞각도 제한은 Clamp가 아니라 ClampAngle을 사용!🐞

        // 제한된 회전값으로 설정
        Controller->SetControlRotation(Rotation);
    }}
8️⃣ 스프린트(달리기) 기능 구현
ASP_Character::ASP_Character()
{
// 생성자 ~

NormalSpeed = 800.0f;
SprintSpeedMultiplier = 2.0f;
SprintSpeed = NormalSpeed * SprintSpeedMultiplier;
GetCharacterMovement()->MaxWalkSpeed = NormalSpeed;

}
void ASP_Character::StartSprint(const FInputActionValue& Value)
{
if(GetCharacterMovement())
{GetCharacterMovement()->MaxWalkSpeed = SprintSpeed;}
}
void ASP_Character::StopSprint(const FInputActionValue& Value)
{
if(GetCharacterMovement())
{GetCharacterMovement()->MaxWalkSpeed = NormalSpeed;}
}- Shift 키를 누르면 SprintSpeed 로 변경, 떼면 NormalSpeed 로 복귀.
🖥️ Full Code
더보기
SP_GameMode.h & .cpp
// Fill out your copyright notice in the Description page of Project Settings.
#pragma once
#include "CoreMinimal.h"
#include "GameFramework/GameMode.h"
#include "SP_GameMode.generated.h"
UCLASS()
class START_API ASP_GameMode : public AGameMode
{
GENERATED_BODY()
public:
ASP_GameMode();
};// Fill out your copyright notice in the Description page of Project Settings.
#include "SP_GameMode.h"
#include "SP_Character.h"
#include "SP_PlayerController.h"
ASP_GameMode::ASP_GameMode()
{
DefaultPawnClass = ASP_Character::StaticClass();
PlayerControllerClass = ASP_PlayerController::StaticClass();
}SP_PlayerController.h & .cpp
// Fill out your copyright notice in the Description page of Project Settings.
#pragma once
#include "CoreMinimal.h"
#include "GameFramework/PlayerController.h"
#include "SP_PlayerController.generated.h"
class UInputMappingContext;
class UInputAction;
UCLASS()
class START_API ASP_PlayerController : public APlayerController
{
GENERATED_BODY()
public:
ASP_PlayerController();
UPROPERTY(EditAnywhere, BlueprintReadWrite, Category = Input)
UInputMappingContext* InuputMappingContext;
UPROPERTY(EditAnywhere, BlueprintReadWrite, Category = Input)
UInputAction* MoveAction;
UPROPERTY(EditAnywhere, BlueprintReadWrite, Category = Input)
UInputAction* LookAction;
UPROPERTY(EditAnywhere, BlueprintReadWrite, Category = Input)
UInputAction* JumpAction;
UPROPERTY(EditAnywhere, BlueprintReadWrite, Category = Input)
UInputAction* SprintAction;
protected:
virtual void BeginPlay() override;
};// Fill out your copyright notice in the Description page of Project Settings.
#include "SP_PlayerController.h"
#include "EnhancedInputSubsystems.h"
ASP_PlayerController::ASP_PlayerController()
:InuputMappingContext(nullptr),MoveAction(nullptr),JumpAction(nullptr),LookAction(nullptr),SprintAction(nullptr)
{
}
void ASP_PlayerController::BeginPlay()
{
Super::BeginPlay();
if (ULocalPlayer* LocalPlayer = GetLocalPlayer())
{
if (UEnhancedInputLocalPlayerSubsystem* Subsystem=
LocalPlayer->GetSubsystem<UEnhancedInputLocalPlayerSubsystem>())
{
if (InuputMappingContext)
{
Subsystem->AddMappingContext(InuputMappingContext, 0);
}
}
}
}SP_Character.h & .cpp
// Fill out your copyright notice in the Description page of Project Settings.
#pragma once
#include "CoreMinimal.h"
#include "GameFramework/Character.h"
#include "SP_Character.generated.h"
struct FInputActionValue;
class USpringArmComponent; // 스프링 암 관련 클래스 헤더 미리 선언(전방 선언)
class UCameraComponent; // 스프링 암 관련 클래스 헤더 미리 선언(전방 선언)
UCLASS()
class START_API ASP_Character : public ACharacter
{
GENERATED_BODY()
public:
// Sets default values for this character's properties
ASP_Character();
UPROPERTY(VisibleAnywhere, BlueprintReadOnly, Category = Camera) // 객체 자체 변경은 불가. 내부 속성은 변경 가능
USpringArmComponent* SpringArm;
UPROPERTY(VisibleAnywhere, BlueprintReadOnly, Category = Camera)
UCameraComponent* Camera;
protected:
UPROPERTY()
int32 JumpCount;
UPROPERTY()
bool bIsJumping;
virtual void SetupPlayerInputComponent(class UInputComponent* PlayerInputComponent) override;
// 입력 바인딩 함수는 리플렉션 시스템에 등록 되어 있어야 입력 시스템에서 인지할 수 있다.
UFUNCTION()
void Move(const FInputActionValue& Value); // 구조체를 참조자로 하지 않으면 모든 데이터를 복사해오기에 무거워진다. const는 참조된 객체를 수정하지 못하도록 막는다는 취지.
UFUNCTION()
void StartJump(const FInputActionValue& Value); //점프와 같이 Bool 타입으로 가져온 동작은 on/off로 나눠주는 편이 좋다.
UFUNCTION()
void StopJump(const FInputActionValue& Value);
UFUNCTION()
void StartSprint(const FInputActionValue& Value);
UFUNCTION()
void StopSprint(const FInputActionValue& Value);
UFUNCTION()
void Look(const FInputActionValue& Value);
float NormalSpeed;
float SprintSpeedMultiplier; // 몇 배를 곱해줄 것인지
float SprintSpeed;
};// Fill out your copyright notice in the Description page of Project Settings.
#include "SP_Character.h"
#include "SP_PlayerController.h"
#include "EnhancedInputComponent.h"
#include "GameFramework/SpringArmComponent.h"
#include "GameFramework/CharacterMovementComponent.h"
#include "Camera/CameraComponent.h"
// Sets default values
ASP_Character::ASP_Character()
{
// Set this character to call Tick() every frame. You can turn this off to improve performance if you don't need it.
PrimaryActorTick.bCanEverTick = false;
SpringArm = CreateDefaultSubobject<USpringArmComponent>("Spring Arm");
SpringArm->SetupAttachment(RootComponent);
SpringArm->TargetArmLength = 300.0f; // 스프링 암의 길이를 설정
SpringArm->bUsePawnControlRotation = true; // 스프링 암이 Pawn의 컨트롤 회전을 따르게 한다.
Camera = CreateDefaultSubobject<UCameraComponent>("Camera");
Camera->SetupAttachment(SpringArm, USpringArmComponent::SocketName);
Camera->bUsePawnControlRotation = false; // 스프링 암이 따라가주기 때문에 카메라는 이 기능을 꺼줘야 한다.
NormalSpeed = 800.0f;
SprintSpeedMultiplier = 2.0f;
SprintSpeed = NormalSpeed * SprintSpeedMultiplier;
GetCharacterMovement()->MaxWalkSpeed = NormalSpeed;
JumpCount = 0;
bIsJumping = false;
}
// Called to bind functionality to input
void ASP_Character::SetupPlayerInputComponent(UInputComponent* PlayerInputComponent)
{
Super::SetupPlayerInputComponent(PlayerInputComponent);
if (UEnhancedInputComponent* EnhancedInput = Cast<UEnhancedInputComponent>(PlayerInputComponent))
{
if (ASP_PlayerController* PlayerController = Cast<ASP_PlayerController>(GetController()))
{
if (PlayerController->MoveAction)
{
EnhancedInput->BindAction(
PlayerController->MoveAction,
ETriggerEvent::Triggered,
this,
&ASP_Character::Move
);
}
if (PlayerController->JumpAction)
{
EnhancedInput->BindAction(
PlayerController->JumpAction,
ETriggerEvent::Triggered,
this,
&ASP_Character::StartJump
);
EnhancedInput->BindAction(
PlayerController->JumpAction,
ETriggerEvent::Completed,
this,
&ASP_Character::StopJump
);
}
if (PlayerController->SprintAction)
{
EnhancedInput->BindAction(
PlayerController->SprintAction,
ETriggerEvent::Triggered,
this,
&ASP_Character::StartSprint
);
EnhancedInput->BindAction(
PlayerController->SprintAction,
ETriggerEvent::Completed,
this,
&ASP_Character::StopSprint
);
}
if (PlayerController->LookAction)
{
EnhancedInput->BindAction(
PlayerController->LookAction,
ETriggerEvent::Triggered,
this,
&ASP_Character::Look
);
}
}
}
}
void ASP_Character::Move(const FInputActionValue& Value)
{
if (!Controller) return;
const FVector2D MoveInput = Value.Get<FVector2D>();
if (!FMath::IsNearlyZero(MoveInput.X))
{
AddMovementInput(GetActorForwardVector(), MoveInput.X);
}
if (!FMath::IsNearlyZero(MoveInput.Y))
{
AddMovementInput(GetActorRightVector(), MoveInput.Y);
}
}
void ASP_Character::StartJump(const FInputActionValue& Value)
{
if(Value.Get<bool>() && !bIsJumping)
{
Jump();
bIsJumping = true;
// 점프 시작 시 로그 출력
JumpCount++;
UE_LOG(LogTemp, Log, TEXT("StartJump() Called"));
GEngine->AddOnScreenDebugMessage(1, 2.0f, FColor::Green, FString::Printf(TEXT("Jump Count: %d"), JumpCount));
}
}
void ASP_Character::StopJump(const FInputActionValue& Value)
{
if(!Value.Get<bool>())
{
StopJumping();
bIsJumping = false;
UE_LOG(LogTemp, Log, TEXT("StopJump() Called"));
}
}
void ASP_Character::StartSprint(const FInputActionValue& Value)
{
    if(GetCharacterMovement())
    {GetCharacterMovement()->MaxWalkSpeed = SprintSpeed;}
}
void ASP_Character::StopSprint(const FInputActionValue& Value)
{
    if(GetCharacterMovement())
    {GetCharacterMovement()->MaxWalkSpeed = NormalSpeed;}
}
void ASP_Character::Look(const FInputActionValue& Value)
{
float Sensitivity = 1.0f;
FVector2D LookInput = Value.Get<FVector2D>();
AddControllerYawInput(LookInput.X * Sensitivity); // Yaw 회전 (좌우 회전)
AddControllerPitchInput(LookInput.Y * Sensitivity); // Pitch 회전 (상하 회전)
// Pitch 제한 적용
if (Controller)
{
FRotator Rotation = Controller->GetControlRotation(); // 현재 회전값 가져오기
// Pitch 값을 제한 (-89도 ~ 89도)
Rotation.Pitch = FMath::ClampAngle(Rotation.Pitch, -60.0f, 60.0f); // 🐞각도 제한은 Clamp가 아니라 ClampAngle을 사용!🐞
// 제한된 회전값으로 설정
Controller->SetControlRotation(Rotation);
}
}🔗참고 링크
https://velog.io/@singery00/UE5-C-C로-캐릭터-조작-구현하기-完
🟣오늘의 옵시디언 현황
'Dev. > UE 언리얼 엔진' 카테고리의 다른 글
| [TIL250210_2] 인터페이스 기반 아이템 클래스 설계하기 (0) | 2025.02.10 |
|---|---|
| [TIL250210_1] State Machine 설계를 통한 캐릭터 동작 애니메이션 적용 (0) | 2025.02.10 |
| [TIL_250131] Character 클래스를 활용한 캐릭터 구현하기(3인칭 카메라 설정, GameMode 설정) (0) | 2025.01.31 |
| [TIL_250130] GameMode 이해하기 (0) | 2025.01.30 |
| [TIL_250129] 회전 발판, 움직이는 장애물, 비물질 발판 구현하기 (2) - &충돌, 히트 감지 (1) | 2025.01.29 |